Download pdf document
Installing floor covering “square” in a room is always important, especially if the floor covering being installed has a pattern. Unfortunately, the walls in a room are rarely perfectly square and should be checked before proceeding with the layout of the flooring.
The use of layout lines on the floor can be one of the best ways to keep your floor covering square. Most installers employ a pencil, a tape measure, and a chalk line to create the necessary lines.
The first part of the process is fairly straightforward and divides the room into four equal sections.
| |
• Measure the length of one wall
• Mark midpoint with a pencil
• Follow the same procedure on the opposing wall
• Stretch a chalk line tight from one mark to the other
• Snap in order to leave a line on the substrate
• This forms the primary line in the squaring process |
We are now ready to establish our secondary line, which is perpendicular to our primary line.
This is done by repeating the entire process with the two remaining walls. Now, it's time to cross our fingers and hold our breath. If the walls from which we first measured are not perfectly square with each other, our two perpendicular lines on the floor will not be square either. To check for accuracy, we use the Pythagorean Theorem, a well known geometric concept, which is more often referred to as the “3, 4, 5 rule” ([3 x 3] + [4 x 4] = [5 x 5]).
Begin your measurement where the two lines on the floor intersect.
| |
• Measure 4-feet and make a mark on the primary line
• Next, measure 3-feet and make a mark on the secondary line
• Then, measure from mark to mark – the measurement will be 5-feet if the two intersecting lines are square, or in other words, at a 90° with each other. |
Nine times out of ten, we will have to adjust our secondary line so that it's a perfect 90° angle with the primary line we constructed. The result of having to adjust our secondary lines is in having unnecessary chalk lines on the floor.
All those unnecessary chalk lines on the floor and all that extra work can be eliminated using other tools and/or methods. Lasers will put two lines on the floor at a 90° angle. Regrettably, it may only work on a portion of the room at a time. In large rooms, the beam of light may not reach the entire distance required. Good lasers are usually quite pricey, too.
Trammel Points are another great layout tool, providing accuracy and the ability to work in any size room. In most areas, a decent pair of Trammel Points can be purchased for under $40. Trammel Points come with two removable points, which are similar to a very sharp awl. The points are sharp enough to stay stationary in a wood subfloor, although care must be used on a concrete substrate. When setting up the Trammel Points for the use of a floor layout, one of the points must be removed and replaced with a pencil. The Trammel Points are then attached to a piece of wood, a section of pipe, a steel straightedge, etc. of a length determined by the size of the room. Trammel Points don't require a lot of measuring or working with numbers to do the layout; making it simpler to get it right the first time.
The layout using Trammel Points
The room is divided in four equal sections. This is done by measuring the length of one wall and marking the midpoint with a pencil. Follow the same procedure for the opposing wall. The chalk line is then stretched tight from one mark to the other, and the chalk line is then snapped, leaving a line on the substrate. This becomes our primary line.
In Photo 1, a sheet of underlayment was used to simulate a room, enabling us to see the whole demonstration in the photos.
Photo 1 – Establishing our primary line
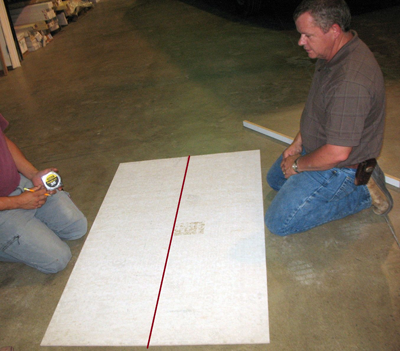
Photo 1
We are now ready to establish our secondary line, which is perpendicular to the primary line. This is done by measuring the length of the primary line and marking the midpoint with a pencil. This mark will be the exact center of the room (see Photo 2).
Photo 2 - Marking the exact center of the room
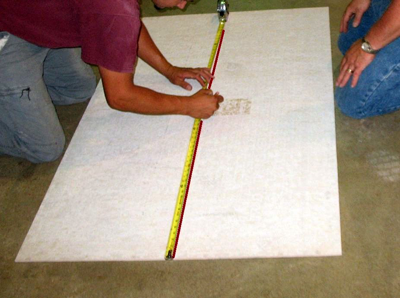
Photo 2
Our use of the tape measure is complete for now and we are ready to use the Trammel points.
Fasten the Trammel points securely to the device of choice (see Photo 3).
The length of the device used may be determined by size of the room, while the distance between the two Trammel points is irrelevant at this point. However, you must leave enough room at the end of the device so the Trammel points can be extended later.
Photo 3 - Trammel points securely fastened to device of choice
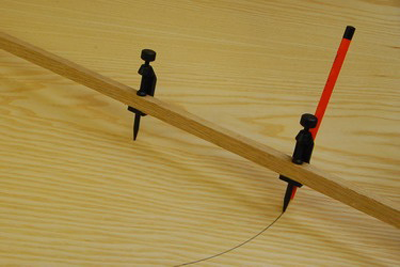
Photo 3
Photos 4 and 5 - Reference marks are established at equal distance on each side of the center mark on the primary line.
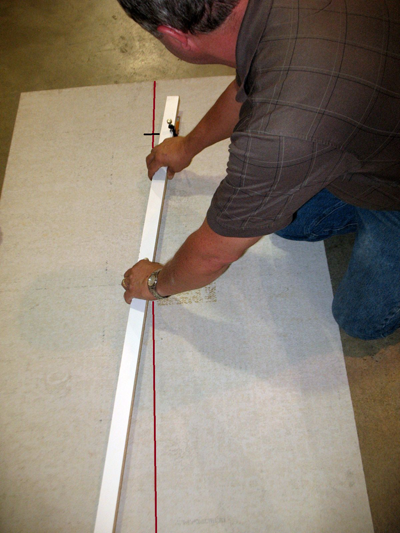
Photo 4
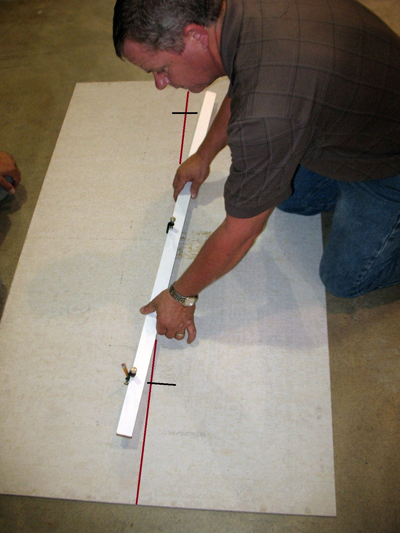
Photo 5
Place the point of the Trammel on the mark you just made on the primary line in the center of room.
Holding the point steady with one of your hands, swing the Trammel with the pencil attached using your other hand and make a small mark on the primary line (see Photo 4).
Repeat the same procedure on the other side of the mark you placed in the center of the primary line (see Photo 5).
Your primary line now has a reference mark on each side of and equal distance from your center mark.
Photos 6 and 7 - Constructing two arcs that intersect perpendicular to the center mark on the primary line is necessary to establish the placement of the secondary line.
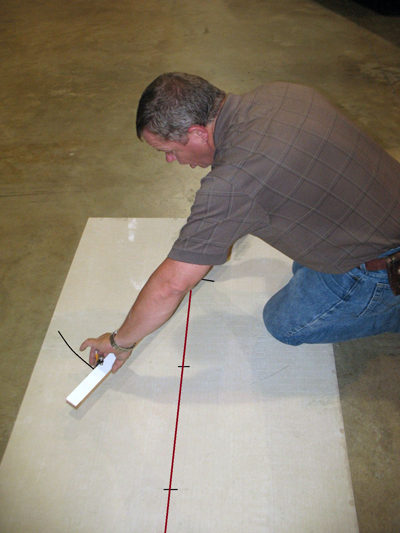
Photo 6
Constructing two arcs that intersect perpendicular to the center mark on the primary line is necessary to establish the placement of the secondary line.
This is done by extending the distance between the Trammel points on the device (if the distance is not extended, the arcs will not intersect each other).
Now, place the point of the Trammel on one of the reference marks we just made on the primary line.
Holding the point steady with one of your hands and swinging the Trammel with the pencil using your other hand, make a large arc perpendicular to the center mark on the primary line (see Photo 6).
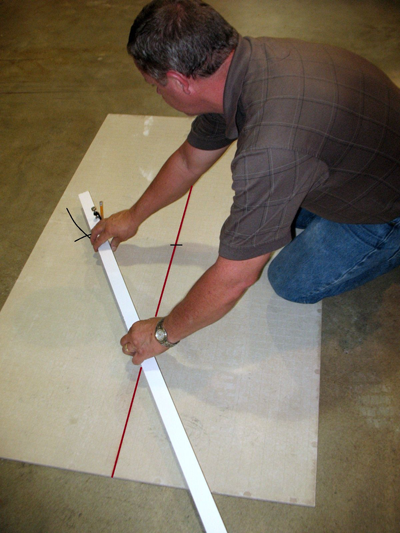 Photo 7 Photo 7
Repeat the same procedure on the opposite side of the mark you made in the center of the primary line.
The substrate will now have two arcs that intersect each other at a right angle of the center mark on the primary line.
Repeat this procedure on the opposite side of the primary line (see Photo 7).
Photo 8 - We now have a secondary line on the substrate at a 90° angle to the primary line. Completed and accurate 90° layout lines will allow any type of pattern flooring to be completely balanced.
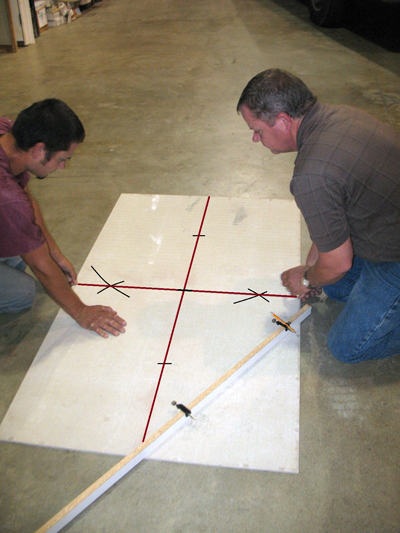
Photo 8
Stretch a chalk line tight from wall to wall directly over the two sets of intersecting arcs and the center mark on the primary line.
The chalk line is then snapped, leaving a line on the substrate.
We now have a secondary line on the substrate perpendicular (at a 90° angle) to the primary line
(see Photo 8).
These layout lines will keep the floor covering square in the room. A dry lay of the flooring will determine whether any of the layout lines will have to be adjusted. For example, when dry fitting a tile (carpet, ceramic, laminate, leather, wood, cork, etc. or anything with a pattern), if the pattern or the tile is less than half its size at the wall, the layout line needs to be moved half the width of the tile or pattern.
This will leave you a much larger pattern or tile at the wall. The floor covering will still be square in the room and perfectly balanced.
45° layout using Trammel points
A 45° layout starts after the square layout lines are completed.
On the original layout, we had a reference mark on each side of the center mark of equal distance on our primary line.
We need our secondary line to have the same references. We can do this a couple ways.
We can adjust our Trammel points to the same exact size as our first reference point and then transfer that size to the secondary line.
Or, we can adjust the Trammel points to any random size and construct four new reference marks of equal distance from the center mark (see Photo 9).
Photo 9 - Yellow arrows indicate the four reference marks of equal distance from the center mark.
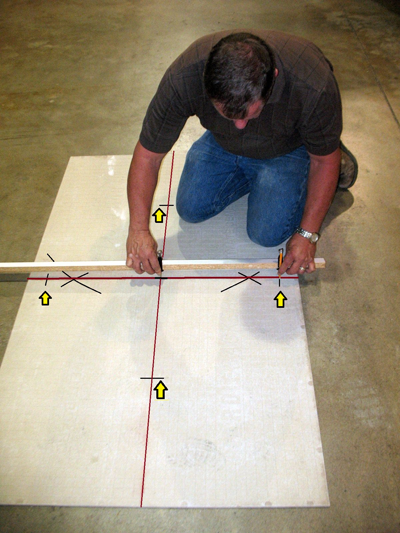
Photo 9
Photos 10 and 11 - The first two arcs that intersect each other at a 45° angle of the center mark on the primary line help establish our 45° layout lines.
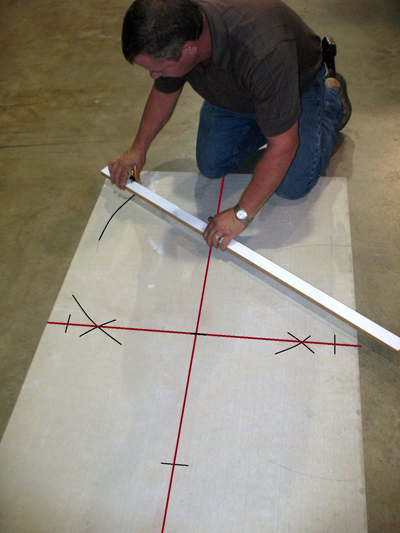
Photo 10
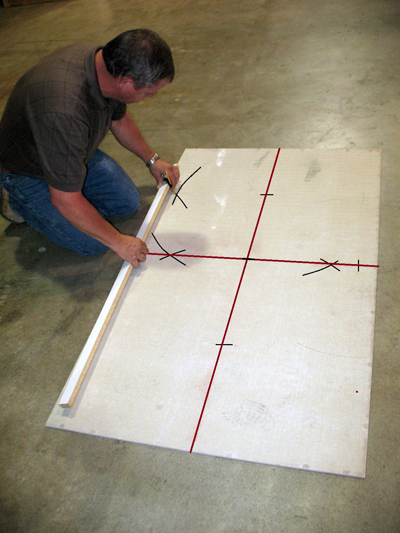
Photo 11
To establish the arcs that intersect for the 45° layout lines, place the point of the Trammel on one of the reference marks on the primary line.
Holding the point steady with one of your hands and swinging the Trammel with the pencil with your other hand, make a large arc in between one of the primary and one of the secondary lines (see Photo 10).
Repeat the same procedure on the adjacent reference mark you made on the secondary line.
The substrate will now have two arcs that intersect each other at a 45° angle of the center mark on the primary line (see Photo 11).
Photo 12 - Completed 45° layout lines that will allow any type of pattern flooring to be completely balanced.
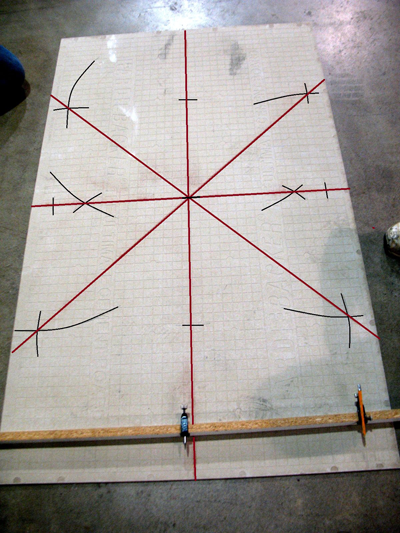
Repeat this procedure on the remaining three reference marks.
We now have intersecting arcs in between all the primary and secondary layout lines.
Stretch a chalk line tight from wall to wall directly over the two sets of intersecting arcs and the center mark on the primary line.
The chalk line is snapped, leaving a line on the substrate.
Repeat this process again on the remaining intersecting arcs.
This will leave you two intersecting lines on the substrate at a 45° angle (see Photo 12).
*While the method described in this article is nothing new to quality-minded experienced installers and can be found in various instruction manuals or on a number of Web sites, my goal was to present the information as directly and plainly as I could.
Simply stated instructions hand-in-hand with clear, concise descriptive photographs leave the risk of error or misunderstanding at a minimum.
It has always been and will continue to be the goal of CFI to provide the best level of installation training to all installers.
|